 The P trap under a sink is one of the most common places for clogs to form. Food debris, grease, soap residue, and other materials often collect inside this curved section of pipe. Over time, that buildup can block water flow and cause problems in your sink.
A clogged P-trap often leads to slow drainage, unpleasant odors, or even standing water in the sink. When debris collects inside the trap, it restricts the path that water normally follows through the drain line.
Fortunately, cleaning a P-trap is usually a simple task. Many homeowners can handle it with basic tools and a little preparation.
In this guide, you’ll learn what a P-trap does, how to recognize signs that it needs cleaning, the tools required, and the six steps to clean a P-trap safely. We’ll also explain when professional drain clearing may be necessary.
Quick Takeaways
- The P trap is the curved pipe located beneath a sink that holds water to block sewer gases.
- Debris like grease, food particles, and soap buildup can clog the P trap.
- Cleaning a P trap typically involves removing the trap, clearing debris, and reinstalling the pipe.
- A bucket, pliers, and gloves are usually all that is needed.
- If clogs keep returning, the blockage may be deeper in the drain line.
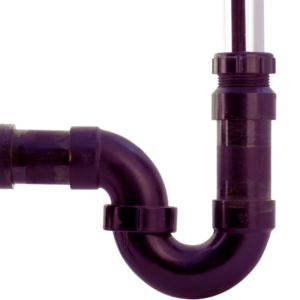
What Is a P Trap and Why It Matters
A P-trap is the curved section of pipe located beneath sinks and other plumbing fixtures. It plays an important role in your plumbing system.
The curved design holds a small amount of water inside the pipe. This water forms a seal that prevents sewer gases from traveling back up through the drain and into your home.
Without this water barrier, unpleasant sewer odors could enter your kitchen or bathroom.
While the P-trap protects your home from sewer gases, it also becomes a natural collection point for debris. Food scraps, grease, soap residue, and small particles often settle inside the trap as water flows through the drain.
Over time, this buildup can restrict water flow and create odors. If the debris continues to accumulate, the sink may begin draining slowly or stop draining altogether.
Signs the P Trap Under Your Sink Needs Cleaning
Many homeowners notice warning signs before the drain becomes completely clogged.
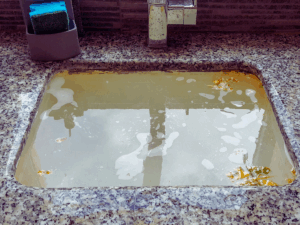 Common symptoms include:
- slow draining water in the sink
- unpleasant odors coming from the drain
- standing water in the basin
- gurgling sounds coming from the pipe
- repeated kitchen sink clogs
These symptoms often indicate debris buildup inside the P-trap. If the blockage grows larger, water may drain more slowly or back up into the sink.
Cleaning the trap can often restore normal drainage.
Tools You Need to Clean a P Trap
Cleaning a P-trap usually requires only a few simple tools that many homeowners already have on hand.
Common items include:
- bucket
- adjustable pliers or wrench
- rubber gloves
- small brush or old toothbrush
- towel or rag
Before removing the trap, place a bucket beneath the pipe. The trap holds water and debris, so the bucket helps catch anything that drains out when the pipe is disconnected.
This step keeps the area clean and prevents water from spilling into your cabinet.
How to Clean a P Trap Under a Sink (Step-by-Step)
Cleaning a P trap involves removing the curved pipe, clearing the debris inside it, and reinstalling the pipe correctly. The process is usually straightforward when done carefully.
Step 1: Place a Bucket Under the Trap
Position a bucket directly beneath the curved pipe under the sink. When the trap is removed, water and debris inside the pipe will drain into the bucket.
This step prevents spills and protects the cabinet area.
Step 2: Loosen the Slip Nuts
The P-trap is connected with slip nuts that hold the pipe sections together.
Use your hands or adjustable pliers to loosen these nuts. Turn them slowly to avoid damaging the pipe or fittings.
Step 3: Remove the P Trap
Once the slip nuts are loose, carefully detach the curved section of pipe.
Allow the water and debris inside the trap to drain into the bucket. You may notice food particles, grease buildup, or other debris that caused the clog.
Step 4: Remove Debris From the Trap
Clear out any debris inside the pipe. Use a small brush and warm water to scrub the interior of the trap.
Make sure all grease, food particles, and residue are removed. This step helps restore proper water flow through the pipe.
Step 5: Reinstall the Trap
Reconnect the P-trap to the drain pipe and sink drain. Align the pipe carefully and tighten the slip nuts by hand.
Avoid overtightening the fittings, which can damage washers or create leaks.
Step 6: Test the Sink
Turn on the faucet and run water through the drain. Watch the pipe connections closely to ensure there are no leaks.
If everything remains dry and the sink drains normally, the cleaning process was successful.
Common Mistakes to Avoid When Cleaning a P Trap
 Cleaning a P-trap is a simple job, but a few common mistakes can create additional problems.
Some issues homeowners encounter include:
- overtightening slip nuts
- losing washers or seals
- reinstalling pipes incorrectly
- skipping the bucket and creating a mess
These mistakes can cause leaks or prevent the pipe from sealing properly. Taking your time and reassembling the trap carefully can help avoid these problems.
How to Prevent P Trap Clogs
A few simple habits can help reduce the chance of clogs forming inside the P-trap.
Helpful prevention tips include:
- avoid pouring grease down the sink
- scrape food scraps into the trash before washing dishes
- flush the drain with hot water periodically
- avoid putting fibrous foods in the garbage disposal
- schedule professional drain maintenance when needed
These habits help prevent debris from accumulating inside the trap and drain line.
When Cleaning the P Trap Won’t Fix the Problem
Sometimes the blockage causing a slow drain is not located inside the trap itself.
If the drain remains slow after cleaning the trap, the clog may be deeper in the drain line.
Situations where DIY cleaning may not solve the problem include:
- recurring clogs after cleaning the trap
- multiple drains draining slowly
- foul sewer odors
- water backing up into sinks or tubs
These signs often indicate a blockage farther down the plumbing system that requires specialized tools to remove.
How to Clean P Trap Under Sink FAQ
How often should you clean a P trap?
Most P-traps do not require routine cleaning unless a clog forms. However, if your sink drains slowly or produces odors, cleaning the trap may help restore proper drainage.
Can a clogged P trap cause a slow draining sink?
Yes. Debris buildup inside the trap restricts water flow through the pipe. As the blockage grows, the sink may drain more slowly or stop draining completely.
Is it safe to remove a P trap yourself?
In many cases, yes. Cleaning a P-trap is usually a simple task that can be completed with basic tools. However, homeowners should proceed carefully and ensure the pipe is reassembled properly.
What happens if the P trap is not cleaned?
If debris continues to accumulate inside the trap, the drain may clog completely. This can lead to standing water, unpleasant odors, and reduced drainage.
When should I call a plumber for a clogged sink?
If the sink continues to drain slowly after cleaning the trap or if multiple drains are affected, the clog may be deeper in the drain line. A plumber can locate and remove the blockage safely.
Need Drain Clearing in Everett? Apollo Plumbing Can Help
![]() If cleaning the P-trap under your sink does not solve the problem, the blockage may be deeper in your drain line.
If cleaning the P-trap under your sink does not solve the problem, the blockage may be deeper in your drain line.
Apollo Plumbing provides professional drain clearing services in Everett, WA and surrounding communities. Our experienced plumbers use advanced tools to locate and remove stubborn drain blockages safely.
If your sink keeps backing up or your drain refuses to clear, our team is ready right now to restore proper drainage and protect your plumbing system.
Contact Apollo Plumbing today to schedule professional drain clearing and get your sink draining properly again.